14 min read · with Coach Finn
The Fourth Discipline: Brick Workouts and Transitions
There is a moment in your first triathlon that nobody warns you about, and it is not the swim, and it is not the hill on the bike, and it is not the final mile of the run.
It is the moment you swing your leg off the bike, plant your feet on the ground, and try to walk. And your legs, which have been your faithful companions your whole life, suddenly belong to someone else. They feel like two pool noodles. You take a step and you genuinely wonder if you are about to fall over in front of strangers.
I want to tell you, right now, before we go a single word further: that feeling is normal, it is universal, and it goes away with a little practice. Every triathlete on earth has felt it. The fast ones. The slow ones. The ones who have done it twenty times. We have all wobbled out of transition looking like a newborn deer on an ice rink.
This chapter is about the part of triathlon that lives in the cracks between the three sports. It is the part most beginners completely ignore, which is a shame, because it is the part where you can gain the most for the least amount of work. We are going to talk about brick workouts, which teach your legs to run after they have cycled, and we are going to talk about transitions, T1 and T2, the little choreographed scrambles where you change from one sport to the next.
People call this the fourth discipline. Let me show you why it matters, and how to make it easy.
What is a brick workout?
A brick workout is simple to describe. You do two disciplines back to back, with no real rest in between. For a triathlete, that almost always means a bike ride followed immediately by a run.
You finish your ride, you rack the bike (or just lean it against the garage wall), you swap your shoes, and you head straight out the door to run. That is a brick. Bike, then run, glued together.
The name, by the way, comes from how your legs feel during it. Like bricks. Coaches will tell you it stands for all sorts of clever things, but honestly, you will understand the name the first time you try one.
Here is why we bother. Your body is brilliant at adapting to exactly the thing you ask of it, and not much else. If you only ever ride your bike, you get good at riding your bike. If you only ever run on fresh legs, you get good at running on fresh legs. But running on fresh legs and running off the bike are two genuinely different skills, and on race day you only get to do the second one.
The brick is how you practice the actual thing the race asks of you. It teaches your body the specific, strange feeling of running after cycling, so that on race day it is familiar instead of frightening. The first time your legs feel like jelly should be in your own neighborhood on a quiet Tuesday, not in the middle of your first event with a hundred people watching.
That is the whole magic of it. You are rehearsing the hardest seam in the whole race, over and over, until your body shrugs and says, oh, this again, I know what to do.
Why do my legs feel weird off the bike?
Let me explain what is actually happening when your legs turn to jelly, because understanding it makes it far less scary.
When you cycle, your legs are doing one very specific job. You are pushing in smooth circles, your muscles are firing in one pattern, and most of your weight is held up by the saddle. Blood is pooled and pumping through your cycling muscles in a particular way. Your body settles into that pattern and gets comfortable.
Then you stop, stand up, and ask those same legs to do a completely different job. Running is not circles, it is impact. It is a totally different muscle pattern, a different rhythm, and now your full body weight is slamming down on each foot instead of resting on a seat. Your nervous system, which had everything dialed in for cycling, has to scramble to rewire itself for running on the fly.
That scramble is the jelly. It is not weakness. It is not a sign you are unfit or that something is wrong. It is just your neuromuscular system recalibrating, switching the blood flow and the muscle patterns and the balance from one sport to the other. Coaches sometimes call it the bike-to-run lag, and it is a known, completely ordinary part of the sport.
And here is the good news, the part I really want you to hold on to. It fades. Every brick you do, the recalibration gets faster and smoother. What feels like a full minute of staggering in your first week becomes thirty seconds, then ten, then a brief funny wobble you barely notice. Your body learns the switch. That is the entire point of training it.
The cadence trick out of T2
There is a small trick that makes the jelly fade even faster on race day, and it costs you nothing.
In the last few minutes of your bike leg, before you come into transition, shift into an easier gear and spin your legs faster. Drop the resistance and pick up your cadence, so your legs are turning over quickly and lightly rather than grinding hard. Spin them out.
Why does this help? Because you are pre-loading the running rhythm. Running has a quick leg turnover. If your legs are already moving fast and loose when you step off the bike, the gap between cycling and running is much smaller, so there is much less for your nervous system to scramble through. You hand your legs a head start.
Then, when you actually begin the run, do not try to power off the line. Take short, quick, light steps for the first few minutes. Quick and small, not long and strong. Let your stride open up naturally as the jelly drains away. Short quick steps off the bike, every single time. It is the simplest fix in this whole book, and it works.
How do triathlon transitions work?
Now let us talk about the changeover itself, because this is where the free time is.
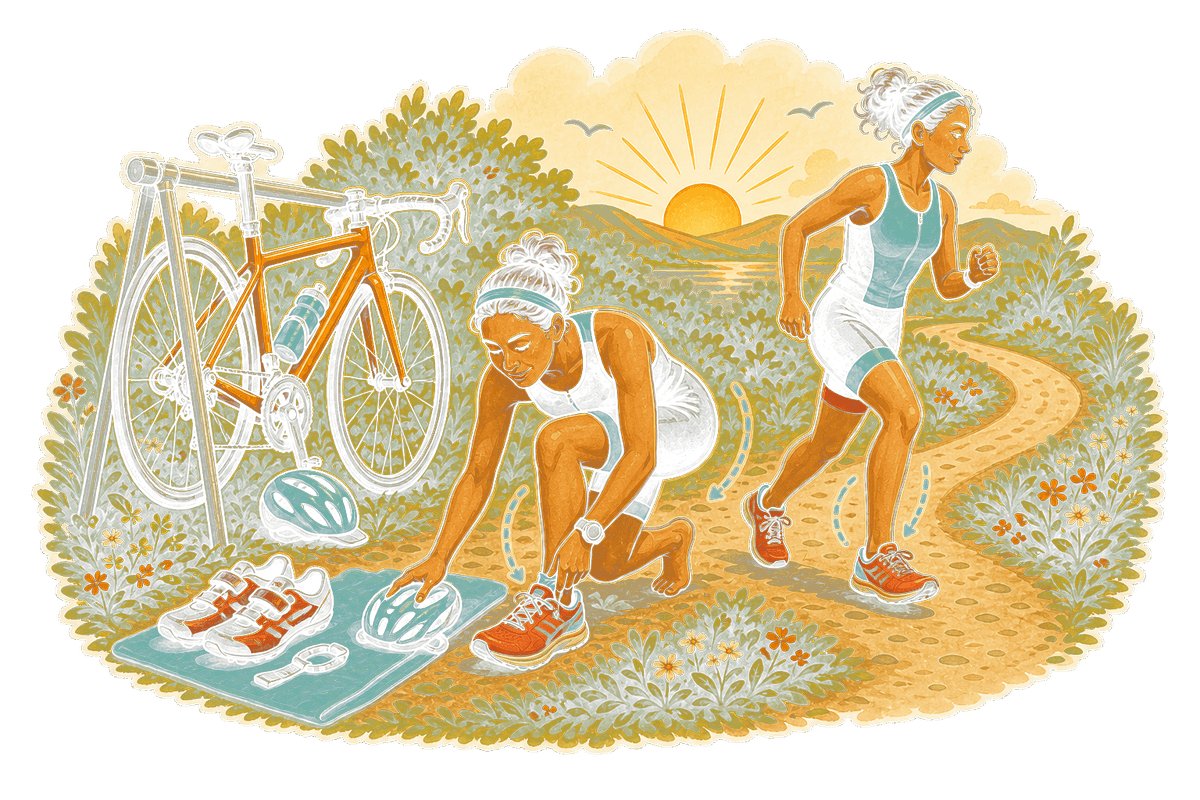
A triathlon has two transitions. T1 is the change from swim to bike. T2 is the change from bike to run. Both happen in the same fenced-off area called transition, where your bike and your gear are waiting for you on a rack.
Here is the part nobody tells beginners, and it is worth saying loudly. The clock does not stop in transition. Every second you spend fumbling with your gear counts toward your finish time, exactly the same as time spent swimming or cycling or running. Most beginners waste somewhere between two and five minutes in transition, fumbling, searching for their stuff, and standing around confused. That is free time you are giving away. We are going to take it back.
Let me walk you through both transitions, step by step, so you know the dance before you have to do it.
T1: swim to bike
You come out of the water, and this is where the famous dizzy stand-up happens. After being horizontal in the water, standing up and running makes a lot of people lightheaded and unsteady. Expect it. Take a breath, get your bearings, and jog, do not sprint, up to transition.
If you are wearing a wetsuit, start peeling it as you go. Reach back, pull the zipper, and strip it down to your waist while you are still moving toward your bike. The arms come out, the suit rolls down to your hips. Then at your spot you yank it the rest of the way down and step out of it. (A little tip: body glide or cooking spray on your ankles and wrists beforehand makes the suit slide off instead of fighting you.)
Now, the single most important rule in all of transition, so read it twice.
Your helmet goes on, and the strap gets buckled, before you touch your bike. Before. Always.
This is not me being fussy. It is a hard rule in the sport, and breaking it gets you a penalty or even disqualified. You cannot so much as lay a hand on your bike until that chin strap is clicked shut. So build the habit now, in training, until it is automatic: helmet first, buckle clicked, then the bike. Make it the very first thing you do at the rack, every time, and you will never have to think about it on race day.
Helmet on and buckled, shoes on, then you grab your bike off the rack and walk or run it out of transition. You are not allowed to ride inside the transition area. You push your bike to the edge, to a painted line on the ground called the mount line. Only after you cross that mount line are you allowed to climb on and start pedaling. Get on before the line, and you earn a penalty. So walk your bike to the line, step over it, then mount up and ride.
T2: bike to run
Coming back in, the same line works in reverse. There is a dismount line painted on the ground, and you must be off your bike, with both feet on the ground, before you cross it. Do not ride past the dismount line. Slow down, swing your leg off, and run alongside your bike up to your spot.
At your spot you rack the bike (hang it back on the rail the same way it was hanging before), and only now, with the bike safely racked, do you take off your helmet. Then the shoe change. Cycling shoes off, running shoes on, and out you go to run.
The shoe change is where elastic laces are worth their weight in gold. Regular laces mean sitting down and tying bows with jelly fingers. Elastic laces (also sold as lock laces) turn your running shoes into slip-ons. You jam your feet in and go. For a nervous beginner, that one cheap upgrade removes a whole moment of fumbling at the exact point you are least coordinated.
Then you run. Short quick steps, remember. Let the legs come back.
How do I set up my transition area?
A good transition starts long before the race, when you set up your little patch of ground. Get this right and the whole thing becomes calm and obvious. Get it wrong and you will be the person standing in a sea of identical bikes, panicking, unable to find your own gear.
Here is how to lay it out.
Find your spot and remember it. When you rack your bike, look around and burn the location into your memory. Count the racks from the entrance. Find a landmark: a tree, a flag, a light pole, a banner. Transition areas are huge and every bike looks the same when you are dizzy and out of breath, so know exactly how to find yours. Walking the route from the swim exit to your bike, and from the bike-in to the run-out, before the race even starts, is one of the smartest five minutes you will ever spend.
Use a towel as your marker. Lay a small, bright towel on the ground beside your bike, under the spot where your front wheel hangs. This does two jobs at once. It is a splash of color you can spot from a distance, which helps you find your gear, and it is the surface you lay your kit out on so everything has a home. A loud, obnoxious color is better than a tasteful one here. You want to see it.
Lay your gear out in the order you will use it. Think about it as a sequence. For the bike, your helmet goes on top, upside down with the straps open and ready, and your sunglasses tucked inside it. Your bike shoes sit next to it. For the run, your running shoes (with the elastic laces) and your race belt and hat. Lay it left to right in the order you reach for it. When you arrive flustered, you do not want to think. You want to grab the next thing in line.
Keep it minimal. This is the big one. Beginners try to bring everything, and all that stuff just slows them down and gives them more to fumble with. Here is the honest minimalist checklist of what you actually need:
- Helmet (straps open, ready to go on)
- Sunglasses (optional, tucked in the helmet)
- Bike shoes, or just your trainers if you ride in regular shoes
- Running shoes with elastic laces
- A race belt with your number on it
- A towel to mark your spot and stand on
- A small water bottle or two on the bike
That is it. That is a complete, race-ready transition. Everything beyond that list is optional, and you should only add it if you have practiced with it. The simpler your setup, the faster and calmer you will be.
Practice it at home, it is the easiest time you will ever save
I told you transition is free time most beginners give away, two to five minutes of it. Here is the wonderful part: you can win most of that back in your own driveway, in your pajamas, for free.
Set up a little mock transition at home. Lay out your towel, put your gear on it in order, and practice the moves. Helmet on, buckle, grab the bike. Walk it out. Come back, rack it, helmet off, shoes swapped, run a few steps. Do it slow at first, then a little quicker, until the order lives in your hands and you do not have to think.
You do not need to be fit to practice this. You do not need to be brave. You just need ten minutes and a willingness to look slightly silly in your own yard. And the payoff is enormous, because while everyone else is losing minutes fumbling, you will flow through transition like you have done it a hundred times. Which, by then, you will have.
This is the closest thing to free speed in the whole sport. A swimmer trains for months to shave a minute. You can shave that same minute off transition in an afternoon. Do not leave it on the table.
How often should I do brick workouts?
A quick word on dosage, because more is not better here.
You do not need to brick every workout. In fact, please do not. One brick a week is plenty for most beginners, and two is the absolute maximum. Bricks are demanding, they ask a lot of your body, and stacking too many of them just leaves you tired and sore without making you fitter.
Quality over quantity, always. A single good brick a week, done with attention, teaches your body everything it needs to know.
And the run off the bike does not need to be long. A transition run of ten to twenty minutes off the bike is perfect. You are not trying to exhaust yourself. You are teaching the switch. Ride your normal ride, then jog easy for ten to twenty minutes, short quick steps off the line, and feel the jelly fade a little more each week. That is a complete, effective brick. Keep it short, keep it good, and keep it rare enough that it stays a treat rather than a grind.
A soft word to close
If all of this feels like a lot right now, take a breath, because here is the thing I most want you to hear.
You do not have to figure out the timing of any of this on your own. The whole reason a structured plan exists is so that you never have to guess what to do or when.
At CouchToTri, bricks show up exactly when you are ready for them, and never one day before. We do not throw a brand-new beginner off the bike and onto a run in week one. First we build your base. We get you comfortable swimming, comfortable cycling, comfortable running, each on its own, until your body has the foundation to handle the two of them joined together. Only then, when the base is genuinely there, do the bricks appear, gently, at the right point in your journey.
So you do not need to worry about whether you are doing this too soon or too late. That is our job. Your job is just to show up, lay out your bright little towel, and trust the wobble. It fades. It always fades. And one day, sooner than you think, you will step off the bike, take a few quick light steps, and realize your legs feel just fine.
You will smile. And you will run.